Categories
Solved

Solved: Setting Up a Nanoleaf Essentials A19 Smart Bulb with a Dimmer Switch

When we first moved into our apartment several years ago I purchased a bunch of ‘smarthome’ equipment. One of those items was a Nanoleaf Essentials A19 Smart Bulb.

It never really worked. At the time it was because our kitchen light was on a dimmer switch and — as I learned — smart lights do not tend to work (well) on dimmers. The only solution was to replace the switch or, instead, not be able to have a smart light.

We couldn’t replace out the switch given that we live in an apartment. And so the Smart Bulb instead acted as a (not very good) dumb bulb for several years. Until now.

The Issue

When I installed the Nanoleaf Essentials A19 Smart Bulb into the kitchen light that was on a dimmer switch I was able to turn on the Smart Bulb. However, I could never get it to connect to my smart home environment. This is a documented issue on Nanoleaf’s support webpage.

I exclusively use Apple products and, in this case, was unable to get the smart bulb to connect to Apple Home or to the Nanoleaf app.

The Environment

The items that I was dealing with included:

The Solution

Fortunately this ended up being a surprisingly easy thing for which to solve.

  1. Remove your Nanoleaf Essentials A19 Smart Bulb and record the 8-digit code that is below the QR code on the bulb.
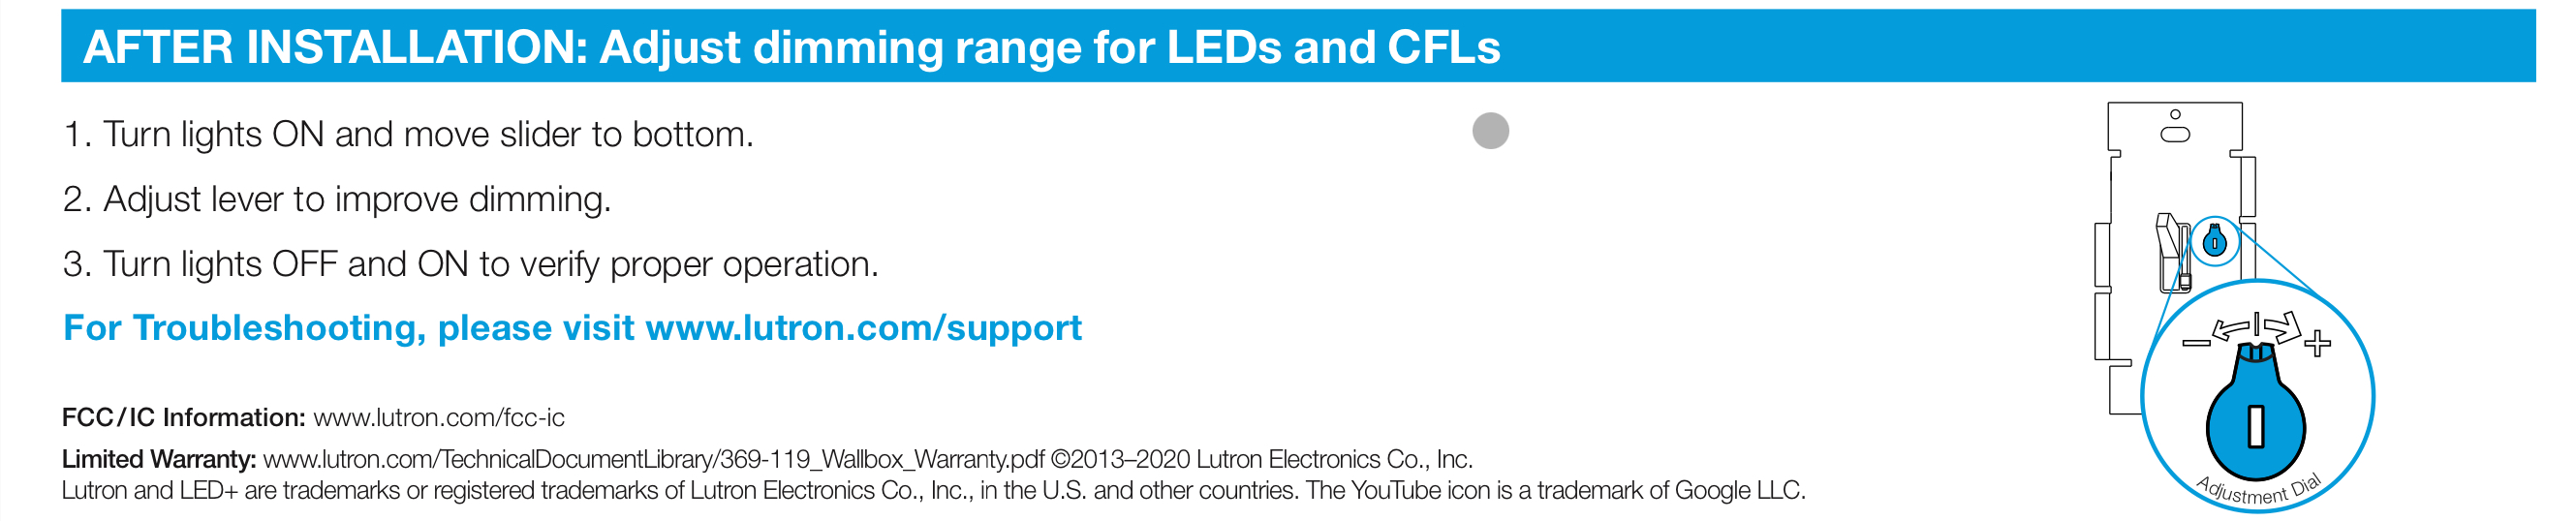
  2. Remove front plate over the Lutron AYCL-153P Dimmer switch.
  3. There will be a small ‘dial’ that you can turn on the switch, to the right of the toggle switch. Turn it all the way to the right.1
  4. Factory reset your Nanoleaf Essentials A19 Smart Bulb2
  5. Disable the 5Ghz wifi radio temporarily on your Eero Pro 6. This involves: Open Eero App >> Settings >> Troubleshooting >> My Device Won’t Connect >> My Device is 2.4 GHz Only >> Click ‘Temporarily Pause 5GHz’. You must do this so that you can connect the Nanoleaf Essentials A19 Smart Bulb to your wireless network, because it only has a 2.4GHz radio.
  6. Add the device to Apple Home on an iOS device. This involves: Click the ‘ ’ icon in the upper right corner of the Apple Home app >> Add Accessory >> More options >> My Accessory Isn’t Shown Here >> Enter Code >> Continue >> Finalize adding the bulb to your Apple Home application.

You will now be able to access your Nanoleaf Essentials A19 Smart Bulb from Apple Home.


  1. IMG_0015
  2. From Nanoleaf: Turn off, wait for 3 seconds, turn back on for no more than 3 seconds. Repeat for a total of 5 power cycles. Bulb will flash red three times if successful. Note that it may take 2-3 second for this flashing to occur after the final power cycle. ↩︎
Categories
Solved

Solved: Connected Meross Smartplug to Eero 6 Pro

I helped set up some Meross smartplugs that were being used to automate home functions. What follows is how I was ultimately able to connect them to an Eero 6 Pro router.

The Problem

When opening the Home application on an iPhone or iPad, and scanning the QR code that was on the smartplug, I received errors that the process could not be completed. I tried resetting the phone, letting the Apple iOS devices linger for up to 5 minutes to complete the connection, and resetting the home hub to see if that would help. In no case were these measures successful.

The Solution

I connected the smartplugs to the Eero 6 Pro network (and Apple Home app) by modifying some of the router’s settings as well as not using the QR code to set up the device.

Specifically I:

  1. Opened the Eero app and temporarily disabled the 5Ghz radio and turned off the WPA3 experimental feature.
  2. Activated airplane mode on the iOS device I was using to connect the Meross plugs to the Home app.
  3. Performed a hard reset on the Meross plugs (this involved holding the power button for 15 seconds. I heard a ‘click’ sound when it reset). I checked to ensure that that the LEDs were blinking between amber and green colours.
  4. Reconnected the iOS device to the Eero 6 Pro router. This ensured that it would establish a 2.4Ghz connection.
  5. Opened the Home app on the iOS device. I then selected ‘Add Accessory’ and, then, the ‘More options…’ link.
  6. In the new options, I saw one that read as a smart plug, and another that had Meross in its name. I choose the one with Meross and then entered in the 8 digit code above the QR code on the smartplug when prompted. I did not connect using the QR code/camera.

The Meross smartplug subsequently connected to the network. As a note, I had to wait up to 30 seconds before it finished its setup.

Meross Smartplug Firmware Update

With the Meross smartplugs connected to the network I updated their firmware. To do so, I:

  1. Downloaded the Meross app and create an account.
  2. Linked the plugs to the account by tapping the ‘ ’ icon in the Home panel in the Meross app, granted the application permission to scan your local network, and then added the switches.
  3. Once they were added, I navigated to the ‘Account’ panel and selected ‘Firmware update’ under ‘System’. I then followed the on-screen instructions to update the plugs.

By the conclusion of this I managed to join the Meross smartplugs to the Eero 6 Pro network, as well as updated their firmware. Hope that this helps to solve any problems you’re encountering with them!